Cool this morning, but the Sun was out, and how many more comfortable days will we have before Winter arrives.
Tested out the film plate adapters. So far they are working well, but I need to get accustomed to handling them within the confines of the dark box.
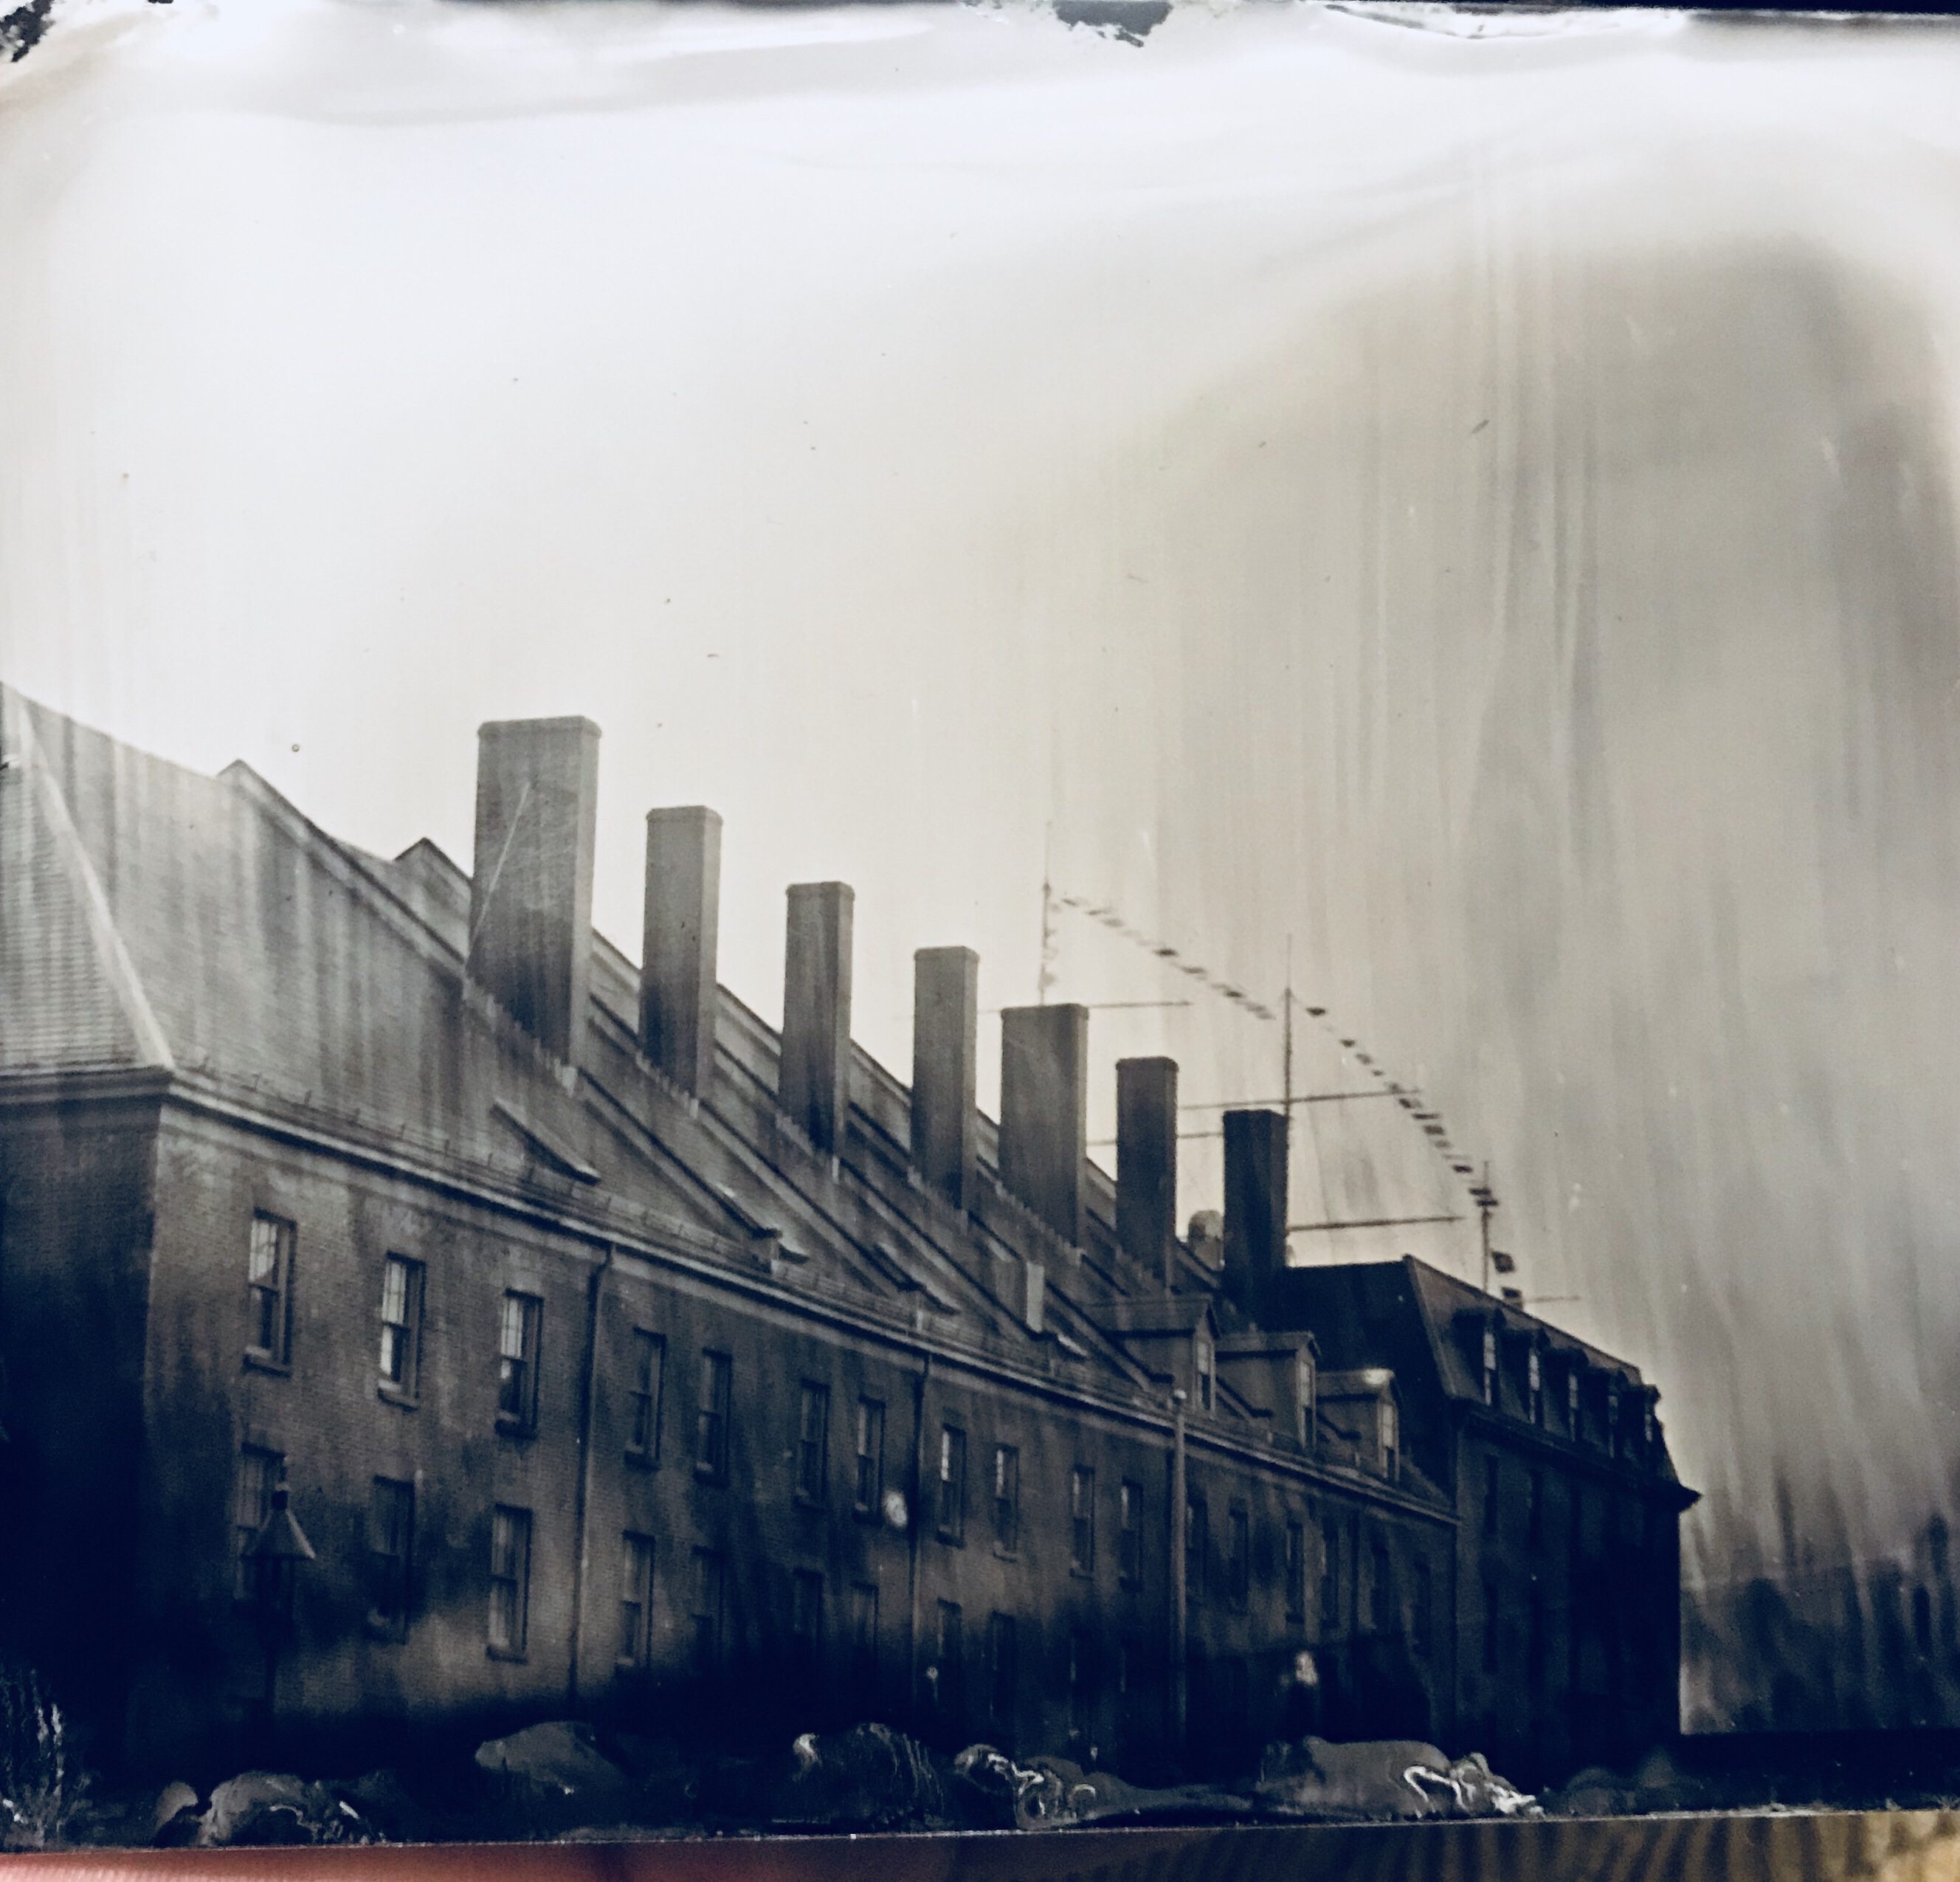
Below is a horrid looking plate. Ran into problems pouring both the collodion, and the developer. Rather then tossing it into the bin I used it for my next experiment.
If you look past the reflection you can make out a faint image of The Bridge.
My standard procedure after exposing the plate would be to bring it into the dark box, pour developer over it, and count slowly to twenty. At this point the plate is placed in a water bath to halt the development process. It is now safe to bring out of the dark box.
This is where the experiment begins. I had heard from a most reliable source that rather than proceeding to the next step of fixing the plate, this is where all the undeveloped silver is removed, and then the plate is washed in either running water, or several trays of water, that a thin solution of vegetable glycerin, cut 50/50 with distilled water, can be poured over the plate, then fixed, and washed at a later date, weeks, or months later!
The plate is now sitting on a shelf where it will remain for a few days, the I’ll wash of the glycerin, and fix the plate as I would normally do. Very excited to see how this turns out. I could allow me to haul around a fraction of the water that I normally would. 22lbs!
Up early, and out for a walk before the wind, and rain began. Culled through some old negatives , and came across this one from many years ago.
This was shot using a Mamiya RB67. A true brick of a camera. This is one of my favorite negatives to work with, and one of my favorite portraits. Wish I was shooting wet plate when I had this young man sitting for me. The wet plate colloidion process renders freckles beautifully.
This portrait was a huge motivator for one of my long bicycle trips in which I set out with the goal of taking a portrait a day, and I look forward to doing another trip in the future.
We have had a fine stretch of weather this November. Sunny, and unseasonably warm for the most part, but today is a rain day, so now I can get a few indoors projects started.
Plate adapter
First off I decided it was time to make some plate adapters. The reason for this is so I do not need to carry around a separate camera back for each sized plate, 4×5, 5×7, and 8×10…
A simple enough solution. Just take an 8×10 plate, and cut a suitable sized hole, and the epoxy tabs in the corners. The tabs serve two functions. First is to keep the sensitized plate in place, but more importantly to insure it is on the same plane as the front of the adapter. This will keep everything in focus.
5×7, and 4×5
To help understand this you need to remember the workings of a large format camera. To focus, and compose the shot, you open the lens up to allow as much light in, then under the dark cloth you can view the image which is both upside down, and inverted horizontally. This may seem a little awkward at first, but I find that it is actually a benefit as it forces you to inspect the whole image without the distraction of seeing what you want, and not what is actually there. The brain can very often filter out parts of an image. We’ve all seen it. You take what you think is a beautiful shot, say two friends sitting together on a park bench, but when you view the finished image you notice everything in the background that was not there before. The tree that looks like it is growing out of the top of their heads, the odd looking person in the background of questionable character, the horizon so out of wack that you can just imagine them sliding off of the bench. You swear that is not what you saw when you composed the shot, and in fact that is somewhat true. You saw what you wanted to see, and filtered out everything else.
8×10 back
Above is an image of the 8×10 camera back with the focusing glass. It is marked with a grid to aid in composition. You’ll also notice the corners are trimmed. This allows air to escape, and enter as you focus. If not for these the bellows would not draw.
Another view of the back. This is set up in what is referred to as the Landscape mode. The plate holder is inserted from right to left between the camera body, and the focus glass.
This may at first seem like a rather complicated process, but the reason it is set up this way makes sense of it. Remember that you have composed, and focused the image on the ground glass, and now your plate has been sensitized, placed in the holder, and now must be put in the camera. The sensitized surface of the plate must end up on the same focal plane as the ground glass you focused on. So, the plate holder just pushes the glass, which is held in place by leaf springs, out of the way.
5×7 adapter
Whilst I was waiting for epoxy to set I worked on another small project. When the plates are washed they then need a place to dry before varnishing, and a place to dry after. I have a small folding rack, not unlike what you would use for dishes, just smaller. It takes up space though, and that is a valuable commodity when touring.
The solution was rather straightforward. Just fabricate two pieces of cedar with slits, and attach them to the inside of the dark box insert.
All it needs now is a coat of varnish, and it’s good to go.
Hope you all had a Happy Thanksgiving. I walked to Chinatown to gorge myself on dumplings. Time for a nap now.
Rain is in the forecast for most of today, and I shall take advantage of it by getting some organizing done, and some printing. But, before that, here is an update on my wet plate work.
I am always looking for ways to reduce the weight of gear that I haul around. Most recently I have been adapting my plate holder, as mentioned in my previous post. This will eliminate the need to carry a 4×5, and a 5×7 back.
The weight of the plates themselves is impressive, but I can eliminate those. I’ll just need to arrange drop off and pickup points, much like hikers on the A.T. It will take a little organizing, route planning, but that is all part of the adventure.
Still searching for a better darkout cloth for the box. What I have now works, but it is rather bulky, and those turned wooden legs that get screwed to the bottom of the box are solid maple. Nice looking, but heavy. None of these items comes even close to the weight of the water that I need to carry. Not just my drinking water, but the water for processing, mainly plate washing.
The developer gets washed off easily enough, but the fixer I use, sodium thiosulfate, needs a rather large amount, more than I can haul around. If this fixer is not sufficiently removed it will darken, and degrade the image over time.
I have found two solutions to this problem. The first is to coat the plates with a thinned out film of vegetable glycerin, then cover the surface with a sheet of acetate, or waxed paper so it will not dry out. Then, when convenient, I can give the plates a thorough wash.
The next solution is using a different fixer. One that does not take as long to work, seconds rather than minutes thus not having as much time to bond with the colloidian making it easier to wash out.
This did not require much research. The fixer that was traditionally used fit the needs that I was looking for. Just a few seconds to fix a plate, and then washed in a few changes of water. The catch? potassium cyanide. A very weak solution at %2, but still dangerous. One of the cautions is to NEVER let it get in contact with an acid, thus creating hydrogen cyanide gas. They say it smells like almonds, and could very well be the last thing you smell. Did I mention that the developer, the step before fixing, is an acid?
I spent a good six months doing research on using potassium cyanide (KCN) as a fixer. Watched numerous videos of some of the most respected Tintypist/ambrotypist, and they were all in agreement in both the hazards of working with KCN, but also the very straight forward, and easy steps to avoid mishaps.
Keep it away from any acids.
Store in a well marked plastic bottle, not glass!
wear gloves when handling
work in a well ventilated area
keep away from acids
So, I prepared a %2 solution a few days ago, outside. Poured it into a well marked plastic storage bottle, and secured it in one of the bottle holders on the trailer.
Down to The Bridge for another plate shooting session. Box set up, silver nitrate poured into bath box, developer mixed, colloidian poured on plate, placed in bath, loaded into film holder, exposed in camera, developed (ACID)!!!, washed, washed washed! Now the moment has come to try the new fixer.
This was fast! I also see an improvement in both contrast, tone. I was very cautious. Washed that plate like there was no tomorrow before putting it in the fixer. Very happy with the results.
I find this whole process fascinating, and look forward to many years of creating images.
“Sweetpea”, my bicycle, is my most prized possession, and I would part with most everything else I own before giving it up. Next on the list, or certainly in the top five, would be the Kodak 8×10 commercial view camera.
The 8×10 on site with the 5×7 reduction back in place.
I had tried numerous times to purchase this model, but was outbid on every occasion, and had all but given up when I spotted one being offered online. The starting bid was within my financial range. So, I put in a bid, with the full expectation that I would once again be outbid. Later that day my phone pinged, informing me it was time to pay, as I was the winner.
Elated that I was now the owner of a large format camera I wired the funds, and made contact with the seller to arrange pickup. As luck would have it, it was just an hours train ride away. Tickets reserved!
It was a beautiful Fall day, and the ride up to Brewster, NY was stunningly beautiful with the foliage at its peak. I met up with the seller in the station house, examined the camera as well as a nice lens that he would offer to sell. Cash, and a handshake, and I was back on the train, back to The City.
I don’t know if I even looked out the window on the return ride. As soon as the train pulled out from the station I opened the box, and pulled out my new camera.
This is not a point and shoot! It is not all that complicated though, and I was fortunate to have used a 4×5 Crown Graphic for many years, so I was some what familiar with how it should work.
To the novice it may seem rather intimidating, but all it is is a box with a hole in one end, and I could easily show most anyone how to perform the most basic functions, and have done just that on a few occasions when out making tintypes.
Before the advent of roll film, images where formed on glass as an ambrotype, or glass plate negative, or as a tintype. This requires a plate holder which allows the sensitized plate to go from the darkroom, to the camera where it will get exposed, and then back to the darkroom for development.
The ambrotype, and tintype are one offs, meaning that if you wanted another portrait, or still life image, a whole new plate would need to be made, and if you wanted a larger, or smaller format, say a 4×5, rather than an 8×10, then a new camera back, or a different camera would need to be used.
Why? Because the photo enlarger was not invented yet, and any reproductions would be done using the contact printing method. So, if you wanted an 8×10 print, then a suitable sized paper would need to be sensitized, and in the early days of photography you would do this yourself, no ready made photographic paper for sometime yet.
This is all to explain why the view camera is so large. Want an 8×10 print? You’ll need and 8×10 negative.
For this camera I have three different backs. That is to say I can use the same camera, and by switching out the back plate, I can change the format size. Easy enough, though it means more to haul around. The simple solution to that is a modified plate holder.
A modified 5×7 plate holder
The above image shows just that. I created this modified plate holder so that I could shoot a smaller test plate for judging exposure. I could do the same with my 8×10 plate holder which would allow me to still shoot 5×7, and 4×5 plates without the need to carry the corresponding backs. Less gear equals less weight!
A video will be posted soon to show the whole production from loading, and unloading, setting up, and shooting a plate, development, and varnishing.
I had read somewhere that the Brooklyn Bridge is one of the most photographed man-made structure in the world, and makes up a bulk of the images in the library of Congress. Certainly, when one sees the masses of tourists walking across at any given time, all with phone in hand to capture a selfie with the bridge as a backdrop, it is not difficult to imagine, but the Brooklyn Bridge’s fame as a photographic subject goes way back before the iPhone.
The wet plate colloidian process, which I use to capture images of the Great Bridge, goes back to the early 1850s. As the construction of the bridge began around 1869 it was certainly photographed during its construction. The photographer would need to have hauled their darkroom down to the shore of the East river, exactly the way that I do, though probably not with a bicycle, and certainly not the comfort of a promenade to work from.
The camera would be set up, image composed on the ground glass, and then the plate prepared, exposed, and developed. Any onlookers would have been thrilled, and amazed to see the image appear like magic as it is placed in the fixer, a weak solution of potassium cyanide.
Few individuals had the wherewithal, or the time to devote themselves to this process. Though not overly complicated it was laborious to haul all that gear around. Believe me.
Then around the 1870s a huge advancement was made in the photographic process. The dry plate was perfected. Now all one needed to do was load a few plates with pre coated emulsion, stroll down to the Bridge, and snap away. No more lugging all that equipment around. Just walk home, pop into the darkroom, and presto you have a glass plate negative.
With this negative you could now make endless prints, or photographs. You could now call yourself a photographer, as opposed to a tintypist, or ambrotypist, depending on your choice of plates.
The wet plate colloidian process would not completely vanish for some time, it would continue on at fair grounds, beachfront amusement locations like Coney Island and the like.
In this age of instant image capture, and sharing where someone that lives thousands of miles away can see what you are eating for lunch, and that’s ok, I have seen some beautiful pictures of crabmeat sandwiches, and curly fries that have made my mouth water, but it is not magical. Not like when the plate is brought out of the darkroom, and placed into the fixer. The faint negative image seems to vanish, and then slowly reappears as a positive. Never get tired of seeing this.
The rain started yesterday evening, and when I awoke this morning it was still coming down. I poured myself another cup of coffee, solved today’s Worldle, and crossword puzzle’s, then got to work.
I have about a dozen tintypes of various size’s that have been waiting to be varnished. I have been putting this off, but have no excuses today.
In theory varnishing the plates is rather simple. Sandarac varnish if used for this. The resin is collected from trees in Northwest Africa, most notably in the Atlas Mountains near Morocco.
The resin is mixed with linseed oil, and in the use of coating tintypes oil of lavender is also added. Rather a pleasant smell during the whole process.
First the plate is warmed. In the field an alcohol lamp is used, but when possible I like to used a standard hair dryer. Open flames, and varnish can have some rather sad results.
The varnish also gets warmed a little, and then it is poured onto the plate in much the same way as the colloidian. Poured off into the bottle. Then the plate is warmed again to aid drying. At this point the varnish surface is extremely tacky, and a magnet for dust. Into the rack it goes to finish curing.
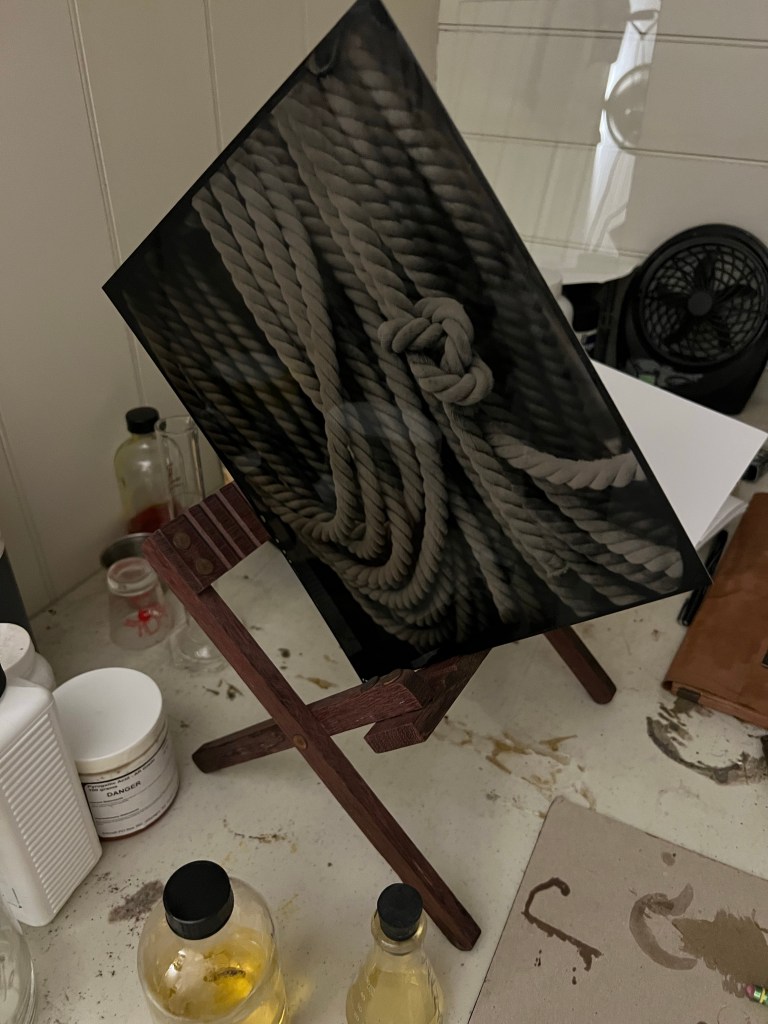
I had all my gear setup, and ready to go early this morning, but opted to enjoy another cup of coffee, and a breakfast of toast, and eggs. So, rather than haul my gear around, I walked around the ship looking for a suitable subject.
It’s all about texture when it comes to the wet plate colloidian process, and this coil of line fit the bill nicely.
My first two plates were 5×7. Exposures at 24, and 34 seconds. f16. Happy with them I decided to change out my setup, and shot an 8×10.
The 5×7 equipment is switched out. The larger silver bath tank is used, and an 8×10 plate holder. The little developing box’s gets a little crowded, but it all seems to work out well.
This exposure was increased to 40 seconds as the clouds rolled in whilst I was getting ready. This was the first 8×10 that I have done in some time, and I am pleased with how it came out. Now the challenge is to not mess it up whilst varnishing.
Weather permitting, I have set a goal to create at least one tintype, or ambrotype a day for as long as possible. With practice I hope to work through the Winter months, and am curious how the cold will affect the process.
I had all my gear spread out in my work space, and decided to see just how long it would take to gather things up, place them in the “Pod”, and be on my way. I managed to pack up, and get underway in just under 20 minutes. Less time than I expected.
I have mentioned set up times before, and the reason I am a little fixated on this is that I need to remind myself that I can have a completed tintype, not including washing, drying, and varnishing, done in under and hour. Knowing this helps me when I spot something that I feel would make a worthwhile image, but am also enjoying the cycling, and don’t want to stop.
So, I need to enjoy the cycling, but to also pause it when I need to set up my gear to make a tintype. Then pack it all up, and be on my way until I spy another potential tintype image.
I went to my usual spot this morning with full intentions of capturing another image of The Bridge, but this little branch caught my eye. I like the texture of the cut end with the growth rings exposed.
The wet plate process creates a grain free image, so one can take a magnifying glass to this and see amazing detail.
Time to clean up now, and get things ready for tomorrow.
After my morning chores were completed I packed up my gear, and set out to The Bridge with the hope of getting a few nice tintypes. Conditions were near perfect, with clear skies, and mild temperatures. I opted not to pack any of the 8×10 plates, and concentrated just on 5×7 tintypes today. If tomorrow is half as nice as today then i’ll work on some 8x10s.
A new batch of developer mixed up yesterday, and i am eager to see how it works. curious if i will see any difference from the older developer that i have been using.
view of The Bridge
I have managed to get my set up time down to just under fifteen minutes, and with practice I hope to get it down to ten. This my not seem that critical, but when I am touring with my bicycle, and I see something that I feel would make a nice tintype, I do not want set up time to be a deciding factor in wether, or not I create an image. This age of just being able to pull out your phone, snap away, then be on your way does have its advantages, but it also sets up a cycle of immediate gratification which can cause its own problems. It takes time to create a wet plate colloidian image, and i want to spend my time doing just that.
Here are a few images of the trailer, which refer to as “PEAPOD” for the simple reason being that my bicycle, being green, was given given the name “SWEETPEA” by a dear friend of mine.
The “Pod” free from the trailer, and unpacked.
The Kodak master view 8×10, trays for development, and fix, along with various bottles of chemicals, beakers, and gear all fit into this beautiful cedar box.
The legs go on first Next, the brace’s for the hoodThen the shroud The silver nitrate bath, plate holder, tray with beaker of developer, and water for rinse.
As you can see, it is an economy of space. Every square inch is used. The set up for an 8×10 plate is takes up about double the amount of space, and requires a bit more finesse.
Two bridges
The normal spot where I would set up was off limits due to construction, so I had to relocate, and I am so glad that I did. When I was composing the image on the ground glass screen I noticed that I could also include the Manhattan bridge as well. Can’t wait to capture this on an 8×10 plate.
Happy with my morning work, and had such fun talking with folks that stopped to see what I was doing. Sold two of my plates on the spot. One left to go!


You must be logged in to post a comment.